Solana 入门笔记
环境配置
系统环境
WSL2 Ubuntu22.04,和一个科学上网环境,最好设置成 Tun 模式 (能够避免很多麻烦)。
Rust
安装
官方上写的是使用 stable 工具链,我环境一直是 nightly 目前也没遇到过大的问题。cargo --version 查看版本信息,rustup toolchain 对工具链进行操作。
但需要注意的是 rust 编译器版本更迭较快,在复现一些题目时遇到一些低版本 solana crate 包,对于大于 1.60 的 Rust 编译器会报错失败。
Rust ide 现在一般都是用的 vscode + rust-analyzer 了,也可以尝试 JetBrain 家的 Rust 插件。
Node (client 交互可选)
直接下载编译好的 tar 包,不走 apt 源
curl -o node.tar.gz https://cdn.npmmirror.com/binaries/node/latest-v18.x/node-v18.14.0-linux-x64.tar.gz
tar -zxf ./node.tar.gz
# ...
# 个人喜欢用 pnpm 来替代 npm
npm install pnpm -g
- @solana/web3.js
- @solana/spl-token
- ...
简单尝试了一下,感觉不如直接用 Rust 写 client 交互。
Solana Cli
官网安装预构建包
然而对于一些 CPU 由于没有对 AVX2 指令集的支持,所以无法直接安装预构建包,需要从源码编译。
经过测试,本地机器 i7 9代的笔电能使用 WSL/Docker 构建预编译包,但是学校服务器 Intel(R) Xeon(R) CPU E5-2640 v4 不知道为啥没法emmm。
从源码构建的话需要找到适配的 rust 版本,我自己构建好了一份 x86_64_linux_unknown_gnu 且不需要 AVX2 的 solana-1.15.1 (对应 rust 版本 1.66),有需要的师傅可以直接下载 (OneDrive),或者使用 Dockerfile 自行构建:
FROM rust:1.66-bullseye AS build

RUN apt-get update && apt-get install -y unzip libudev-dev pkg-config clang

RUN mkdir /build

WORKDIR /build
RUN wget -q "https://github.com/solana-labs/solana/archive/refs/tags/v1.15.1.zip" \
    && unzip ./v1.15.1.zip \
    && rm ./v1.15.1.zip

RUN ./solana-1.15.1/scripts/cargo-install-all.sh .

RUN rm -r ./solana-1.15.1
常用命令
# solana cli 更新
solana-install update
# 查看本地 solana 配置
solana config get
# 创建一个 keypair,以文件的方式默认存储在 `~/.config/solana/id.json`
# `--outfile` 参数指定 path
solana-keygen new
# 设置 keypair
solana config set -k ~/.config/solana/id.json
# 设置连接的 url
# - 主网 https://api.mainnet-beta.solana.com
# - 开发网 https://api.devnet.solana.com
# - 测试网 https://api.testnet.solana.com
solana config set --url localhost
# 给当前钱包空投 sol (限 devnet 和 testnet)
solana airdrop <num>
# 查看当前钱包余额
solana balance
# 本地测试链
solana-test-validator
# 构建 so 文件
cargo build-bpf
# 部署
solana program deploy ./target/deploy/name.so
# 从主网加载合约程序
# solana program dump -u <source cluster (m/d/t)> <address of account to fetch> <destination file name/path>
solana program dump -u m 9xQeWvG816bUx9EPjHmaT23yvVM2ZWbrrpZb9PusVFin serum_dex_v3.so
# 将合约程序加载到本地链上
solana-test-validator --bpf-program 9xQeWvG816bUx9EPjHmaT23yvVM2ZWbrrpZb9PusVFin serum_dex_v3.so --reset
概念
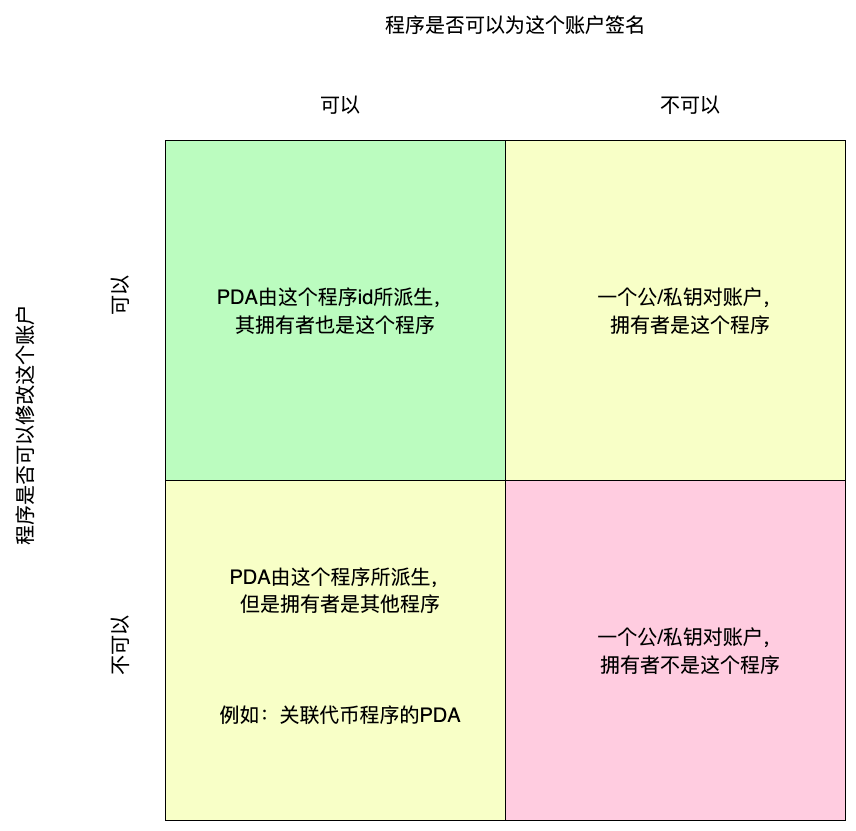
账户 Account
Solana 的账户其作用是用来存放数据 (store state) 的,一共有三类账户:
- Data Account,用来存储状态
- Program Account,用来存储可执行程序
- Native Account,用来存储原生程序,如果把 Solana 比作 Linux 系统,那么这就像是系统内核,提供一些基本的方法接口
在 Data Account 中又有两类:
- 系统所有账户
- 程序派生账户(PDA)
/// An Account with data that is stored on chain
#[repr(C)]
pub struct Account {
    /// lamports in the account
    pub lamports: u64,
    /// data held in this account
    #[serde(with = "serde_bytes")]
    pub data: Vec<u8>,
    /// the program that owns this account. If executable, the program that loads this account.
    pub owner: Pubkey,
    /// this account's data contains a loaded program (and is now read-only)
    pub executable: bool,
    /// the epoch at which this account will next owe rent
    pub rent_epoch: Epoch,
}
| 字段 | 描述 |
|---|---|
| data | 存储的数据 |
| executable | 判断是否是可执行程序 |
| lamports | 账户余额,1 sol = 1e9 lamports |
| owner | 账户所有者 |
| rentEpoch | 下一个需要付租金的 epoch,为 0 即表示免租金 |
可以看到存储程序的账户并没有保存状态,因此 Solana 的合约程序是 无状态 的,这是跟 solidity 很不同的一点。如果想对于一个合约程序进行状态的存储,那么可以使用派生账户(PDA),即用一个程序和 seed 来生成一个地址,该程序便是这个账户的 owner,用 rust 写那就是 Pubkey::from_program_address(&[], program_id)。
通常用户直接使用的是系统所有账户,owner 是 System Program,一个原生程序;程序账户的 owner 是 BPF Loader;PDA 是指通过程序和 seed (可有可无) 来生成的一类地址,它的 owner 是某个程序。
地址 Address
一个账户拥有一个地址,如果将账户对应文件系统中的一个文件,那么地址便是文件的路径。通常来说,地址是一个 256 位的 ed25519 公钥。其 keypair 落在椭圆曲线上。
但对于 Program 来说,其 Program ID 便是它的地址,在生成的时候它也可能是一个随意的固定长度字符串,比如 System Program 的 ID 便是 11111111111111111111111111111111。
这里有一个特性是所有 PDA 账户不存在公钥对应的私钥,因为其生成算法生成的密钥对不在椭圆曲线上,它的数据只能被 owner 程序所修改。
租金 Rent
在账户中存储数据需要花费 SOL 来维持,这部分花费的 SOL 被称作租金。如果账户中的余额大于两年租金的 SOL, 这个账户就可以被豁免付租 (Rent Exemption)。
RPC 方法 getminimumbalanceforrentexemption 能够计算最小的免租金额,同样可以使用 solana rent <datasize> 来获取。
当一个账户没有足够的余额支付租金时,这个账户会被释放,数据会被清除。
指令 Instruction
最基本的交互单元,可以直接看 rust 中的结构体定义
pub struct Instruction {
    /// Pubkey of the instruction processor that executes this instruction
    pub program_id: Pubkey,
    /// Metadata for what accounts should be passed to the instruction processor
    pub accounts: Vec<AccountMeta>,
    /// Opaque data passed to the instruction processor
    pub data: Vec<u8>,
}
- 多个指令可以被打包进入同一个交易当中
- 指令会被自动的按顺序执行
- 如果一个指令的任何一部分失败,整个交易就会失败
交易 Transaction
组成:
- Signature 数组
- Message
其中 Message 是签名后的指令数组。
Transaction 结构:
pub struct Transaction {
    /// A set of signatures of a serialized [`Message`], signed by the first
    /// keys of the `Message`'s [`account_keys`], where the number of signatures
    /// is equal to [`num_required_signatures`] of the `Message`'s
    /// [`MessageHeader`].
    ///
    /// [`account_keys`]: Message::account_keys
    /// [`MessageHeader`]: crate::message::MessageHeader
    /// [`num_required_signatures`]: crate::message::MessageHeader::num_required_signatures
    // NOTE: Serialization-related changes must be paired with the direct read at sigverify.
    #[wasm_bindgen(skip)]
    #[serde(with = "short_vec")]
    pub signatures: Vec<Signature>,

    /// The message to sign.
    #[wasm_bindgen(skip)]
    pub message: Message,
}
Message 结构:
pub struct Message {
    /// The message header, identifying signed and read-only `account_keys`.
    // NOTE: Serialization-related changes must be paired with the direct read at sigverify.
    #[wasm_bindgen(skip)]
    pub header: MessageHeader,

    /// All the account keys used by this transaction.
    #[wasm_bindgen(skip)]
    #[serde(with = "short_vec")]
    pub account_keys: Vec<Pubkey>,

    /// The id of a recent ledger entry.
    pub recent_blockhash: Hash,

    /// Programs that will be executed in sequence and committed in one atomic transaction if all
    /// succeed.
    #[wasm_bindgen(skip)]
    #[serde(with = "short_vec")]
    pub instructions: Vec<CompiledInstruction>,
}
一些特点:
- 交易必须明确列出链上程序可以读取或写入的每个帐户,每个交易都需要至少有一个
writable账户,用于为交易签名。这个账户无论交易成功与否都需要为交易成本付费。 如果付费者没有足够为交易付费的余额,这个交易就会被丢弃。 - 对于每笔交易能够包含多条指令,并且在对于一些 Read-Only 的账户状态能够执行并行读操作
- 指令是最小的可执行逻辑,一个指令 fail,整个交易 fail
- 交易包括一个或多个数字签名,每个数字签名对应于交易引用的帐户地址。这些地址中的每一个都必须是 ed25519 密钥对的公钥,并且签名表示匹配私钥的持有者签名,因此“授权”交易。在这种情况下,该帐户称为签名者。帐户是否是签名者会作为帐户元数据的一部分传达给程序。然后程序可以使用该信息来做出授权决定。
- 交易费用目前仅取决于交易中包含的签名数量:
这是一个完整的客户端交易构造
let ix = Instruction {
    program_id: flag_program::id(),
    accounts: vec![
        AccountMeta {
            pubkey: account_pubkey,
            is_signer: false,
            is_writable: false,
        },
        AccountMeta {
            pubkey: fee_payer.pubkey(),
            is_signer: true,
            is_writable: false,
        },
    ],
    data: Vec::new(),
};
let blockhash = client.get_recent_blockhash().expect("get blockhash").0;
let tx = Transaction::new_signed_with_payer(
    &[ix],
    Some(&fee_payer.pubkey()),
    &[&fee_payer],
    blockhash,
);
let sig = client
    .send_and_confirm_transaction_with_spinner_and_config(
        &tx,
        CommitmentConfig::finalized(),
        RpcSendTransactionConfig {
            skip_preflight: true,
            ..Default::default()
        },
    )
    .expect("send flag tx");
跟进源码可以知道,首先是 Message::new(instructions, payer),其中对于 keys 和 instructions 进行编译,主要有分类,去重,记录等过程。
然后调用 Transaction::sign(self, from_keypairs, recent_blockhash) 对消息进行 ed25519 签名,需要知道的是这里并不是直接使用的 sercret key,阅读源码会发现是由其生成的 ExpandedSecretKey,类型是 sha512。
接着是交互,先将 Transaction 进行序列化输出为字节数组,Solana 底层采用了 bincode 这个 crate 包来做这件事,然后根据不同版本来进行 base58/base64 编码,形成 params,与其他数据组合成 json:
json!({
    "jsonrpc": jsonrpc, // "2.0"
    "id": id,
    "method": format!("{}", self), // "sendTransaction"
    "params": params,
})
然后发出 rpc 请求。
目前 Solana 有两种 transaction 版本,legacy 和 0,上述过程是 legacy,而 0 相对于此增加了对于 Address Lookup Tables 的支持。
地址查找表 Address Lookup Tables
在一笔交易中,账户地址列表最多只能为 32 个。为了解决容纳更多地址参与一次交易,Solana 引入了地址查找表(Address Lookup Tables)的概念,这个概念是在 Solana v1.7 引入的,能够在一次交易中容纳 256 个账户地址。
程序 Program
Solana 中的程序便是 Solidity 中的智能合约,不同之处在于其是无状态的,所有的和程序交互的数据都是存储在独立的账户中,通过指令传入程序。
对于每个程序有一个单独的入口点,在 Rust 中使用 entrypoint 宏标注入口函数:
pub fn process_instruction(
    program_id: &Pubkey,
    accounts: &[AccountInfo],
    instruction_data: &[u8]
) -> ProgramResult {}
Native Program
原生程序提供了运行验证节点(validator)所需的功能。比如 System Program。 这个程序负责管理建立新账户以及在两个账户之间转账SOL。
原生程序表
- System Program
- Config Program
- Stake Program
- Vote Program
- BPF Loader
- Ed25519 Program
- Secp256k1 Program
SPL Program
SPL程序定义了一系列的链上活动,其中包括针对代币的创建,交换,借贷,以及创建质押池,维护链上域名解析服务等。

常见漏洞点
Missing ownership check
fn withdraw_token_restricted(program_id: &Pubkey, accounts: &[AccountInfo], amount: u64) -> ProgramResult {
    let account_iter = &mut accounts.iter();
    let vault = next_account_info(account_iter)?;
    let admin = next_account_info(account_iter)?;
    let config = ConfigAccount::unpack(next_account_info(account_iter)?)?;
    let vault_authority = next_account_info(account_iter)?;


    if config.admin != admin.pubkey() {
        return Err(ProgramError::InvalidAdminAccount);
    }

    // ...
    // Transfer funds from vault to admin using vault_authority
    // ...

    Ok(())
}
Fix:
Missing signer check
fn update_admin(program_id: &Pubkey, accounts: &[AccountInfo]) -> ProgramResult {
let account_iter = &mut accounts.iter();
let config = ConfigAccount::unpack(next_account_info(account_iter)?)?;
let admin = next_account_info(account_iter)?;
let new_admin = next_account_info(account_iter)?;
// ...
// Validate the config account...
// ...
if admin.pubkey() != config.admin {
return Err(ProgramError::InvalidAdminAccount);
}
config.admin = new_admin.pubkey();
Ok(())
}
例子中虽然验证了 config 账户的合法性,但是没有验证 admin 是否是签名者,所以可以直接调用 admin 的 pubkey 来更新 admin。
Fix:
Integer overflow & underflow
同 solidity,就不展开说了。
Arbitrary signed program invocation
pub fn process_withdraw(program_id: &Pubkey, accounts: &[AccountInfo], amount: u64) -> ProgramResult {
let account_info_iter = &mut accounts.iter();
let vault = next_account_info(account_info_iter)?;
let vault_authority = next_account_info(account_info_iter)?;
let destination = next_account_info(account_info_iter)?;
let token_program = next_account_info(account_info_iter)?;
// ...
// get signer seeds, validate account owners and signers,
// and verify that the user can withdraw the supplied amount
// ...
// invoke unverified token_program
invoke_signed(
&spl_token::instruction::transfer(
&token_program.key,
&vault.key,
&destination.key,
&vault_authority.key,
&[&vault_authority.key],
amount,
)?,
&[
vault.clone(),
destination.clone(),
vault_owner_info.clone(),
token_program.clone(),
],
&[&seeds],
)?;
Ok(())
}
在程序中没有对 token_program 进行验证,所以我们可以构造一个恶意的 token_program,然后覆写其 transfer 指令。
但其实对于 spl-token 等之类的 System Program 或 SPL 程序来说,21年后已经不存在了,因为在其更改中,在程序内部又使用 check_program_account 对程序的 Pubkey 进行了验证。

不过对于其他一些链上用户程序来说,不妨是一种思路。
Fix: 添加程序ID验证
Type cosplay
// ------- Account Types --------
pub struct Config {
pub admin: Pubkey,
pub fee: u32,
pub user_count: u32,
}
pub struct User {
pub user_authority: Pubkey,
pub balance: u64,
}
// ------- Helper functions --------
fn unpack_config(account: &AccountInfo) -> Result<Config, ProgramError> {
let mut config: Config = deserialize(&mut account.data.borrow())?;
return config;
}
// ------- Contract Instructions ---------
fn create_user(program_id: &Pubkey, accounts: &[AccountInfo]) -> ProgramResult {
let account_iter = &mut accounts.iter();
let user = next_account_info(account_iter)?;
// ...
// Initialize a User struct, set user_authority
// to user and set balance to 0
// ...
Ok(())
}
fn withdraw_tokens(program_id: &Pubkey, accounts: &[AccountInfo], amount: u64) -> ProgramResult {
let account_iter = &mut accounts.iter();
let vault = next_account_info(account_iter)?;
let admin = next_account_info(account_iter)?;
let config = unpack_config(next_account_info(account_iter)?)?;
let vault_authority = next_account_info(account_iter)?;
if config.owner != program_id {
    return Err(ProgramError::InvalidConfigAccount);
}
if config.admin != admin.pubkey() {
return Err(ProgramError::InvalidAdminAccount);
}
// ...
// Transfer funds from vault to admin using vault_authority
// ...
Ok(())
}
对于每个指令,传入的 accounts 是完全可控的,比如上述代码中的 create_user ,其实也可以传入一个 Config 的 account,那么操作的便是相对应的数据,设置 user 的 user_authority, 实际是在设置 config 的 admin。其他数据类似。但实际利用需要查明一些具体类型的结构布局。
Fix: 添加一个 enum,用来区分不同的账户类型。
Seed collisions
let result = (Pubkey::from_str("BriX1Bv33M2s9xKRzBftvtK1HL5QEhU1Aaixg6NemP8v").unwrap(), 255);
assert_eq!(result, Pubkey::find_program_address(&["se".as_bytes(), "abc".as_bytes()], &system_program::id()));
assert_eq!(result, Pubkey::find_program_address(&["seabc".as_bytes()], &system_program::id()));
在 create_program_address 的函数文档中说的很清楚:
/// Warning: Because of the way the seeds are hashed there is a potential
/// for program address collisions for the same program id.  The seeds are
/// hashed sequentially which means that seeds {"abcdef"}, {"abc", "def"},
/// and {"ab", "cd", "ef"} will all result in the same program address given
/// the same program id.  Since the change of collision is local to a given
/// program id the developer of that program must take care to choose seeds
/// that do not collide with themselves.
N1CTF 2022 - Utility Payment Service 便是这个考点。 - 赵哥 - TonyCrane
入门题目
allesctf2021 secret-store
代码量相对有点多,但题目本身给了很好的交互环境,主要是让选手熟悉以下 solana。
简单分析下 cli,program 有些部分就略过了。
initialize_ledger- 创建了一个 Flag Mint 账户存储 token 信息,合计有 16 个
- 创建了一个 token account, holder 是
flag_depot,token 有 16 个 - 创建了 flag 原生程序账户,名字是
flagloader_program - 创建了 store 程序账户,同时写入了字节码数据
setup- 创建了一个 store 程序的派生地址,用来存储数据 secret
- 调用
StoreInstruction::Initialize- 携带随机生成的 secret
- 将
flag_depot对应 token 账户的 authority 设置为 store 派生地址,并在该地址 (store PDA) 写入 secret
getflag- 调用
StoreInstruction::GetFlag- 一系列校验,同时检验参数的 secret 是否与 store 中的 seret 相同
- 然后将
flag_depot对应 token 账户的 authority 设置为可控的账户地址
- 调用
flag_program- 校验 token 账户是否有余额,并验证 token owner 的 Signer 身份
- 输出 flag
所以这题的关键是获取 secret。其实链上的数据都能被所有人看到,可以直接读出其数据然后调用指令控制 token 的账户。
查看 solana 链上的数据有很多方法
- Json RPC。直接向 rpc 传递 json 数据
- Solana explorer。Solana 浏览器进行查询
- 官方提供的 SDK 交互
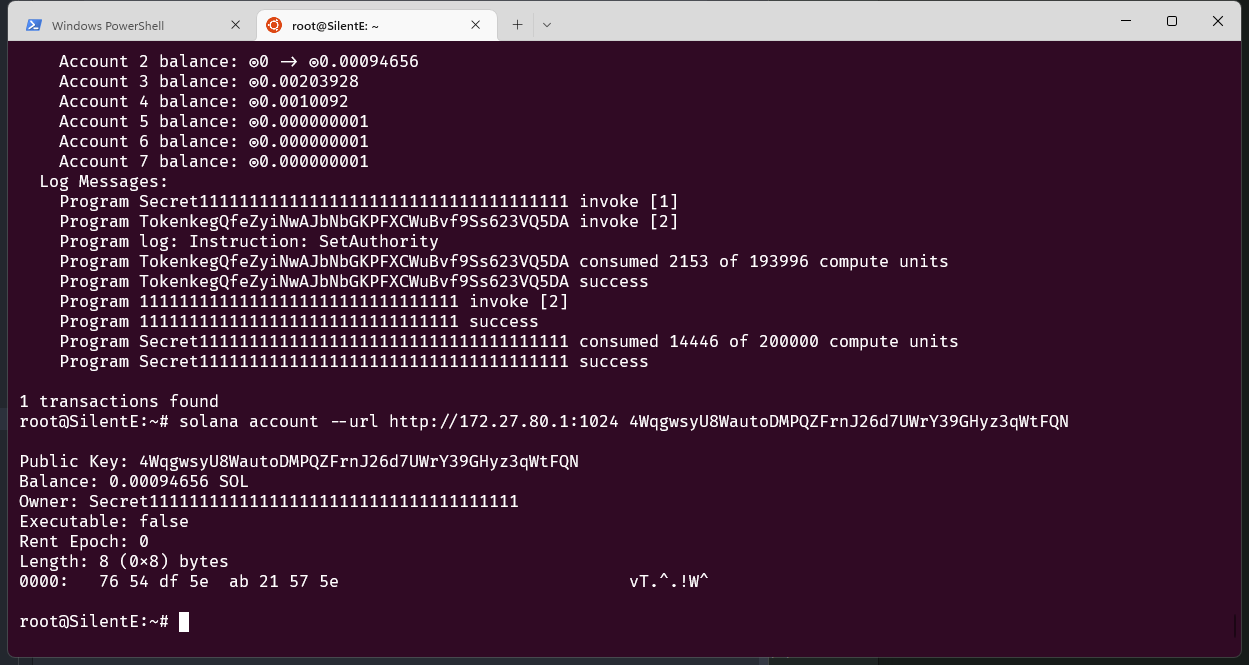
- Solana cli
# 查看一个地址的交易记录
solana transaction-history --show-transactions --url http://localhost:1024 "address"
# 查看地址的账户信息
solana account --url http://localhost:1024 "address"
# Public Key:
# Balance:
# Owner:
# Executable:
# Rent Epoch:
# Length:
# ... (Data)
对我们而言这道题只需要找到 store 账户,然后获取其 data 就行。
由于这题的 secret 是在 setup 时传入的,也可以直接使用浏览器查看 setup 时的传参数据:
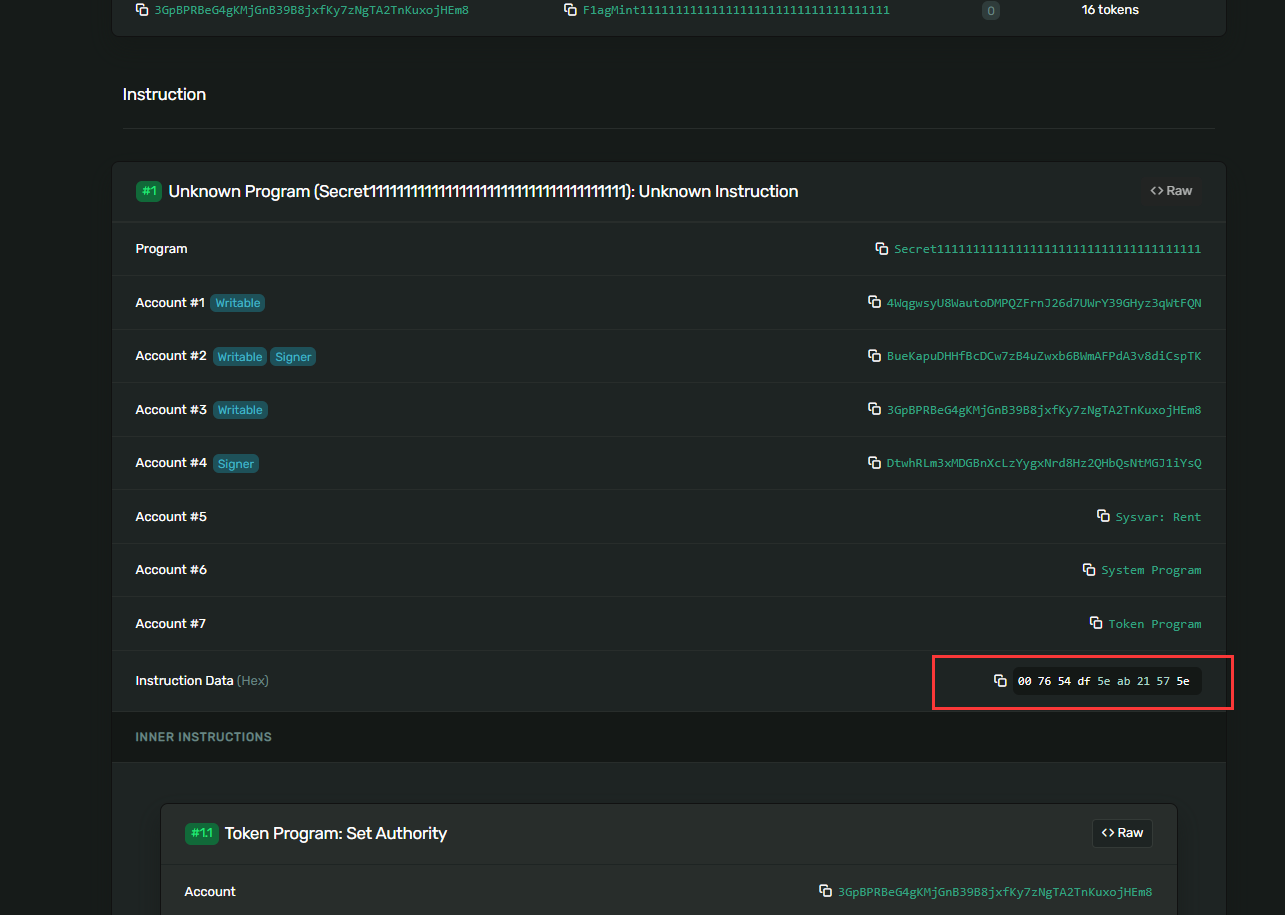
后一个知识点就是数据的 pack/unpack。在 Rust 中对数据进行了序列化处理,由于 secret 是 u64,所以单看这一个数据类型来说,Solana 是按小端序存储,所以读取也需要这样来,这里可以使用 Python struct 包来帮助我们操作:
然后编译一份提供的 store cli 调用 get flag

allesctf2021 legit-bank
类似于上题,相同的初始化过程:
- 创建了一个 Flag Mint 账户存储 token 信息,合计有 16 个
- 创建了一个 token account, holder 是
flag_depot,token 有 16 个 - 创建了 flag 原生程序账户,名字是
flagloader_program - 创建了 bank 程序账户,同时写入了字节码数据
- 创建了 bank_manager 账户,拥有 100 sol
然后可以看题目 program,可以看到有如下几个指令:
/// Instructions that this program supports
#[derive(Debug, BorshDeserialize, BorshSerialize)]
pub enum BankInstruction {
    /// Initialize the bank
    Initialize { reserve_rate: u8 },

    /// Open a new user account with the bank
    Open,

    /// Transfer money into bank account
    Deposit { amount: u64 },

    /// Withdraw money from bank account
    Withdraw { amount: u64 },

    /// (Manager only) take money for investing
    Invest { amount: u64 },
}
题目的突破点在于 invest 函数:
fn invest(_program_id: &Pubkey, accounts: &[AccountInfo], amount: u64) -> ProgramResult {
    let [bank_info, vault_info, vault_authority_info, dest_token_account_info, manager_info, _spl_token_program] =
        array_ref![accounts, 0, 6];
    // verify that manager has approved
    if !manager_info.is_signer {
        return Err(ProgramError::MissingRequiredSignature);
    }

    // verify that manager is correct
    let bank: Bank = Bank::try_from_slice(&bank_info.data.borrow())?;
    if bank.manager_key != manager_info.key.to_bytes() {
        return Err(0xbeefbeef.into());
    }

    // verify that the vault is correct
    if vault_info.key.as_ref() != &bank.vault_key {
        return Err(ProgramError::InvalidArgument);
    }

    // verify that enough money is left in reserve
    let vault = spl_token::state::Account::unpack(&vault_info.data.borrow())?;
    if (vault.amount - amount) * 100 < bank.total_deposit * u64::from(bank.reserve_rate) {
        return Err(0xfeedf00d.into());
    }

    // transfer tokens to manager
    invoke_signed(
        &spl_token::instruction::transfer(
            &spl_token::ID,
            &vault_info.key,
            &dest_token_account_info.key,
            &vault_authority_info.key,
            &[],
            amount,
        )?,
        &[
            vault_info.clone(),
            dest_token_account_info.clone(),
            vault_authority_info.clone(),
        ],
        &[&[vault_info.key.as_ref(), &[bank.vault_authority_seed]]],
    )?;

    Ok(())
}
bank.manager_key == manager_info.key,但就像前面所说的 任意程序调用 ,程序中并没有对 bank 进行校验,那么我们便可以构造一个恶意的 bank 程序,其中 manager_key 设置为我们的地址,然后调用 invest 即可。
Solana 的交互感觉有点难写,可以使用 solana-poc-framework 这个 crate 包来帮助我们构造交互。
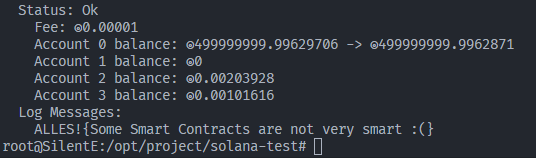
出题人的代码已经很优雅了,这里就不贴了 :P
主要流程便是用链上的 bank 信息,替换我们的 manager_key,然后再将这账户数据上链,最后调用 invest 即可。
Ref & Tools
- Soldev - 全方面收集 solana 的各种资源
- 官方文档 - 全而杂
- cookbook - 简单明显的概念总结
- anchor 的 solana 文档 - 也写的挺好的
- 在线编译 - 体验一下
- 常见漏洞点 - 博客的其他文章也挺好的
- 浏览器 - 支持 Custom RPC
- Solana CTF Challenges
- poc-framework
创建日期: February 15, 2023 14:15:52